RSS feeds play a crucial role in automating content distribution. By connecting an RSS feed to an email marketing platform, marketers can automatically generate and send email newsletters that are relevant and up-to-date.
Some types of emails—like podcast notifications—might only need a single RSS feed. Simple and straightforward. More involved email newsletters often work with multiple content streams, from blogs to YouTube to podcasts. With every additional content stream you add, the value of automating the curation and sending process grows.
Let’s dive a little deeper into how to leverage multiple RSS feeds within an email digest or newsletter—and what benefits this approach can bring.
3 Benefits of Multiple RSS Feed Emails
Let’s take a look at the top 3 benefits of connecting multiple RSS feeds to your email newsletter curation and sending process:

Benefit 1: A simplified process
RSS feeds can deliver the latest content directly to your ESP, saving you hours of time curating and manually adding each piece individually. With hours saved on every email, you’re able to reallocate time and energy to more creative ventures.
Benefit 2: On-time distribution
When you start automating your newsletter creation process, emails can send on a schedule that runs independent of your team’s bandwidth, ensuring prompt updates for your audience without compromising quality. Whether you’re working with breaking news headlines or are curating industry topics, getting your email out efficiently can help give you an edge as a content authority.
Benefit 3: A value-rich email
Inbox fatigue is an ever-increasing issue when it comes to engaging with your email subscribers. Creating a rich and varied email through multiple RSS feeds and content sources helps to increase the perceived value of your content. Ultimately, this can translate into higher open rates, clicks, and conversions.
Despite these advantages, multiple RSS feed emails remain under-used within content teams. Often, marketers are unaware of the capabilities and potential impact of this approach or are hesitant to adopt new strategies amidst their busy schedules.
Here’s how to get it done in just a few minutes:
How to set up a multi-RSS feed newsletter (the easy way)
As we’ve noted elsewhere, many mainstream ESPs lack the ability to pull in RSS feeds on their own. Fortunately, FeedOtter natively integrates with some of the most popular email service providers.
The advanced Multiple RSS Feed Options found within FeedOtter allows you to connect multiple content source feeds into one email newsletter. That way, you can present multiple RSS feeds from different categories in one email instead of sending out a campaign for each feed—and as the content cheerleaders we are, that’s exciting!
Note: FeedOtter currently integrates with MailChimp, Marketo, Pardot, Eloqua, Salesforce Marketing Cloud, and Hubspot.
To be a little more specific: one feed may be regularly updated blog entries, and the other might include more static presentations like job postings or case studies. The handy thing with the advanced FeedOtter options is that you have control over every aspect of your feeds, including the ability to click on/click off any of the feeds involved in your single campaign.
Here’s how to get set up and running with just a few clicks:
Step 1: Gather your RSS feed URL
The first thing you need to do is find the appropriate RSS feeds that involve different categories of marketing content.
For simplicity sake, we are going to use Hubspot for our example:
https://blog.hubspot.com/marketing/rss.xml
https://blog.hubspot.com/sales/rss.xml
https://blog.hubspot.com/service/rss.xml
Step 2: Set up your multiple RSS feed email in FeedOtter
Head over to your FeedOtter account. Under the Automated tab, you can create a new automated email or edit one that’s already created. Once in the email editor, go to Feeds and insert each feed and then click the Next button, which should bring you to the template library.

Step 3: Choose a “Multifeed” email template
Click on the blue Template Library button to view the predesigned email templates available. (Note that you can also opt for a custom template design by reaching out to FeedOtter support directly.)
Here, you’ll want to select the Multifeed category. After you’ve completed that step, the rest of the template customization falls to your personal preferences.

For Advanced Users:
If you are building your own custom email template using the FeedOtter RSS email template guide you can easily find multiple post loops for use in your email below the feed entry boxes. Use these “for loops” to display content from the appropriate feeds in your email.
Step 4: Set your automation parameters
Under the Schedule tab, you can decide how frequently this email sends out, as well as what will trigger the send (so you don’t have to worry about sending multiple emails with the same content, if there’s a lull between new content pieces.)
The way that FeedOtter’s automation works is that it looks at all of your feeds by default and tries to determine whether or not there is new content—if there is, it will send. By checking which feed should trigger that send, you can now exercise more control over your campaigns.

Key Takeaways
In today’s fast-paced digital landscape, marketers face the constant challenge of delivering relevant and engaging content to their audience. This task can be particularly daunting when working with multiple content streams and a frequent email newsletter cadence. The more content you send out, the longer it takes to manually curate and build your newsletters.
At some point, scaling your email strategy becomes entirely dependent on the size of your content team…or the automations you have in place.
Which is why RSS feeds are an essential tool for content marketing curation—and are easier than ever to utilize with the power of tools like FeedOtter, which plug directly into your ESP, allowing you to automate multiple RSS feeds and plug them directly into your email campaigns.
Additional Resources:
[ad_2]
Source link
[ad_2]
Source link
Ever wondered what the Recipient Time Zone option below your Marketo scheduler was for? Anytime you’re sending marketing emails to your recipients, a big question can be the best time to send this email you’ve carefully curated. You can always find blog posts and research on the optimal time to send your emails for the best open and engagement rates possible. But what happens when your recipients are from all different areas, living in different time zones? Lucky for Marketo users, sending in recipient time zone is a given option so you can still choose the most optimal time to send your marketing emails, and Marketo will send the email at that exact time for each recipient.
How recipient time zones work in Marketo
Marketo calculates the recipient time zone by looking at their city, state, country, or zip code fields. If not filled in, Marketo will use inferred city/state/country/zip code fields. While you can’t directly update a contact’s time zone, updating any of the above location fields will allow Marketo to better determine the time zone to use for sending your emails.
Ultimately, if Marketo cannot determine your recipient’s time zone they will default to sending based on your subscription’s time zone. No need to worry too much though, as Marketo has plenty of resources and checks before defaulting to your subscription’s time zone.
How to set up recipient time zone sending
The option to use recipient time zones will be available when you schedule your email send. Just create and schedule your email, and then check the box directly below the scheduler for Recipient Time Zone.

Now with scheduling your Marketo email, there are two scenarios that can occur and will affect how/when the email is sent to each subscriber.
Scenario 1: Scheduled within 25 hours
If your email is scheduled to go out in less than 25 hours from the current time, there may be recipients on your smart list that have already passed the scheduled time in their time zone. Not a problem, as Marketo gives you a couple options for when these recipients should receive your email.
Deliver the following day in recipient’s time zone: If the scheduled time has already passed for the user, you can opt to wait and send the email to that recipient the following day at the time scheduled.
Deliver using program’s default set time: The recipient will receive the email at the time you’ve scheduled in your time zone, meaning the email will be sent to this recipient at the time you’ve scheduled in your subscription’s time zone, no matter what time it will be for the recipient.
- After selecting Recipient Time Zone, click the Gear icon that appears to the right.
- Select one of the following options(explained above) and click Save.
- Approve the program and your email will start to run.

Scenario 2: Scheduled more than 25 hours out
If your email is scheduled more than 25 hours in advance, then you’re all set! Marketo will be able to send to each recipient at your scheduled time in their time zone with no additional steps.
NOTE: Marketo will only show the Gear icon if your email is scheduled for less than 25 hours from your current time, so need to worry or do extra math when scheduling your emails.
How to use with FeedOtter emails
Automating your emails with FeedOtter but still want to send your emails using recipient time zone? Not a problem. Once you’ve created your automated newsletter, follow the steps below:
- Go to your Marketo account > Marketing Activities.
- Find your FeedOtter program > ### – FeedOtter Setup email program.
- Check the Recipient Time Zone box on your setup program. This setting will carry over for all future emails.

Since FeedOtter emails are scheduled and sent via Marketo at the time you schedule in FeedOtter, this will cause the email to be sending in Scenario 1. In this case, Marketo defaults to the first option of delivering the following day in the recipient’s time zone.
Now you’re all set! No more worrying about your broad recipient list, your emails will be sent at the right time for your recipient.
[ad_2]
Source link
Elon Musk’s ongoing battle with the media since his $44 billion takeover of Twitter last year seems to have taken a foul turn.
The Twitter owner took to his platform on Sunday morning to share that all press inquiries sent to Twitter would receive an automated reply of a rather undignified emoji of poop.
Entrepreneur decided to test this theory by sending Twitter a message asking for confirmation if Musk was being serious or full of … well, you get it.
Related: ‘It’s a Long Story’: Elon Musk Publicly Apologizes to Disabled Employee After Squabble on Twitter
It turns out that Musk wasn’t bluffing.
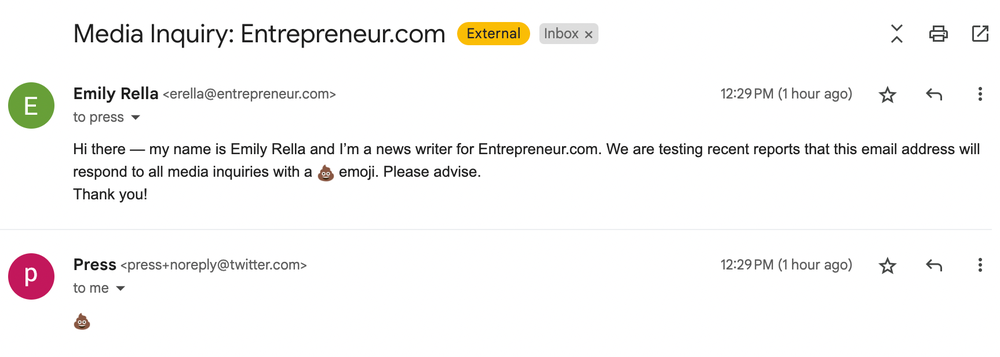
Lovely.
Musk is also no fan of having a PR department. In 2020, he fired the entire PR department at Tesla, where he also serves as CEO, which made contacting with the electric car company impossible, and left journalists to scavenge for whatever information was released during shareholder and town hall meetings.
Related: Report: Steve Davis Will Replace Elon Musk As Twitter CEO
After Musk took over Twitter, the communications team was hit hard by layoffs and dissolved almost entirely. Several high-level team members like Brian Poliakoff (global head of corporate and customer communications) and Julie Steele (director and head of global internal communication) were axed last fall.
Since then, those who have contacted Twitter via the press@Twitter.com email address have received no response.
Musk’s latest poop emoji antics come after a public battle with a former employee, Haraldur “Halli” Þorleifsson, who claimed that he could not confirm with Twitter’s HR department whether or not he had been fired once he was locked out of Twitter’s internal computer system.
Dear @elonmusk
9 days ago the access to my work computer was cut, along with about 200 other Twitter employees.
However your head of HR is not able to confirm if I am an employee or not. You’ve not answered my emails.
Maybe if enough people retweet you’ll answer me here?
— Halli (@iamharaldur) March 6, 2023
Twitter’s latest layoffs chopped an estimated 200 employees (around 10% of remaining staff), bringing the workforce to less than 2,000.
[ad_2]
Source link
Ever wondered what the Recipient Time Zone option below your Marketo scheduler was for? Anytime you’re sending marketing emails to your recipients, a big question can be the best time to send this email you’ve carefully curated. You can always find blog posts and research on the optimal time to send your emails for the best open and engagement rates possible. But what happens when your recipients are from all different areas, living in different time zones? Lucky for Marketo users, sending in recipient time zone is a given option so you can still choose the most optimal time to send your marketing emails, and Marketo will send the email at that exact time for each recipient.
How recipient time zones work in Marketo
Marketo calculates the recipient time zone by looking at their city, state, country, or zip code fields. If not filled in, Marketo will use inferred city/state/country/zip code fields. While you can’t directly update a contact’s time zone, updating any of the above location fields will allow Marketo to better determine the time zone to use for sending your emails.
Ultimately, if Marketo cannot determine your recipient’s time zone they will default to sending based on your subscription’s time zone. No need to worry too much though, as Marketo has plenty of resources and checks before defaulting to your subscription’s time zone.
How to set up recipient time zone sending
The option to use recipient time zones will be available when you schedule your email send. Just create and schedule your email, and then check the box directly below the scheduler for Recipient Time Zone.
Now with scheduling your Marketo email, there are two scenarios that can occur and will affect how/when the email is sent to each subscriber.
Scenario 1: Scheduled within 25 hours
If your email is scheduled to go out in less than 25 hours from the current time, there may be recipients on your smart list that have already passed the scheduled time in their time zone. Not a problem, as Marketo gives you a couple options for when these recipients should receive your email.
Deliver the following day in recipient’s time zone: If the scheduled time has already passed for the user, you can opt to wait and send the email to that recipient the following day at the time scheduled.
Deliver using program’s default set time: The recipient will receive the email at the time you’ve scheduled in your time zone, meaning the email will be sent to this recipient at the time you’ve scheduled in your subscription’s time zone, no matter what time it will be for the recipient.
- After selecting Recipient Time Zone, click the Gear icon that appears to the right.
- Select one of the following options(explained above) and click Save.
- Approve the program and your email will start to run.
Scenario 2: Scheduled more than 25 hours out
If your email is scheduled more than 25 hours in advance, then you’re all set! Marketo will be able to send to each recipient at your scheduled time in their time zone with no additional steps.
NOTE: Marketo will only show the Gear icon if your email is scheduled for less than 25 hours from your current time, so need to worry or do extra math when scheduling your emails.
How to use with FeedOtter emails
Automating your emails with FeedOtter but still want to send your emails using recipient time zone? Not a problem. Once you’ve created your automated newsletter, follow the steps below:
- Go to your Marketo account > Marketing Activities.
- Find your FeedOtter program > ### – FeedOtter Setup email program.
- Check the Recipient Time Zone box on your setup program. This setting will carry over for all future emails.
Since FeedOtter emails are scheduled and sent via Marketo at the time you schedule in FeedOtter, this will cause the email to be sending in Scenario 1. In this case, Marketo defaults to the first option of delivering the following day in the recipient’s time zone.
Now you’re all set! No more worrying about your broad recipient list, your emails will be sent at the right time for your recipient.
[ad_2]
Source link
Working with email automation and customers sending website content to their subscribers, we see lots of questions about high unsubscribe rates and what our best tips for reducing unsubscribes on routine content emails are. Gaining lead subscribers is one thing, keeping them can be just as difficult for marketers.
Reducing Unsubscribes
The first step to reducing unsubscribes is to know why people unsubscribed in the first place. Was it the content? The email design? Just too much static in their inbox? Here, we’ll walk through the 3 common reasons we see for unsubscribes and how to prevent them.
1. Email Design
Anyone who’s ever manually created a content email knows how difficult and sensitive HTML can be to work with. If you’re HTML email template isn’t coded well it can cause major issues in the styling and look of the email in your subscribers’ inbox.
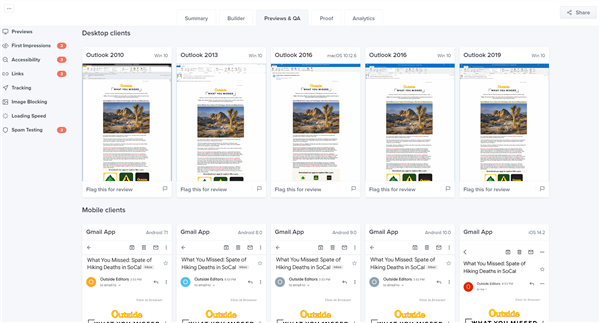
Email design can also differ between email browsers. Whether your subscriber has their emails in dark mode, or using Outlook vs. Chrome, it can change the way your subscriber sees your email and may not look the way you created it. The best way to see how your email will look in your subscribers’ inboxes is to test the email design in a tool like Litmus or Email on Acid.
These tools let you preview the email design in all the most common email browsers to ensure your email looks exactly the way you want it to. You can also create a shareable link to share with your team, and make edits to the code and see live changes as you work.
2. Mailing Frequency
All of us have tons of marketing emails flooding our inbox on a daily basis. If you’re sending too much or hardly at all, subscribers may feel they aren’t getting what they asked for. As soon as subscribers are getting antsy about all the emails in their inbox they may start unsubscribing.
For the sake of reducing unsubscribes on your emails ask yourself: How often are your subscribers getting these content emails? Are they also getting this content from a different automated campaign? How often do your subscribers need/want this content in their inbox?
Marketing is all about hitting your target with the right content at the right time. One great way to ensure you’re sending content when your subscribers want it is by using an email preference center and asking your subscribers how often they want to receive your content. The important thing to remember is to always honor your preference center and make sure your subscribers are getting what they opted in for.
3. It’s Time to Clean Up Your Mailing List
Usually we think the more subscribers to our content the better, but if your content stops being something they’re interested in it may be best to remove them before they hit the unsubscribe button. The important thing to remember with cleaning your mailing list is the goal is always to make sure your subscriber is seeing the content they want, when they want it.
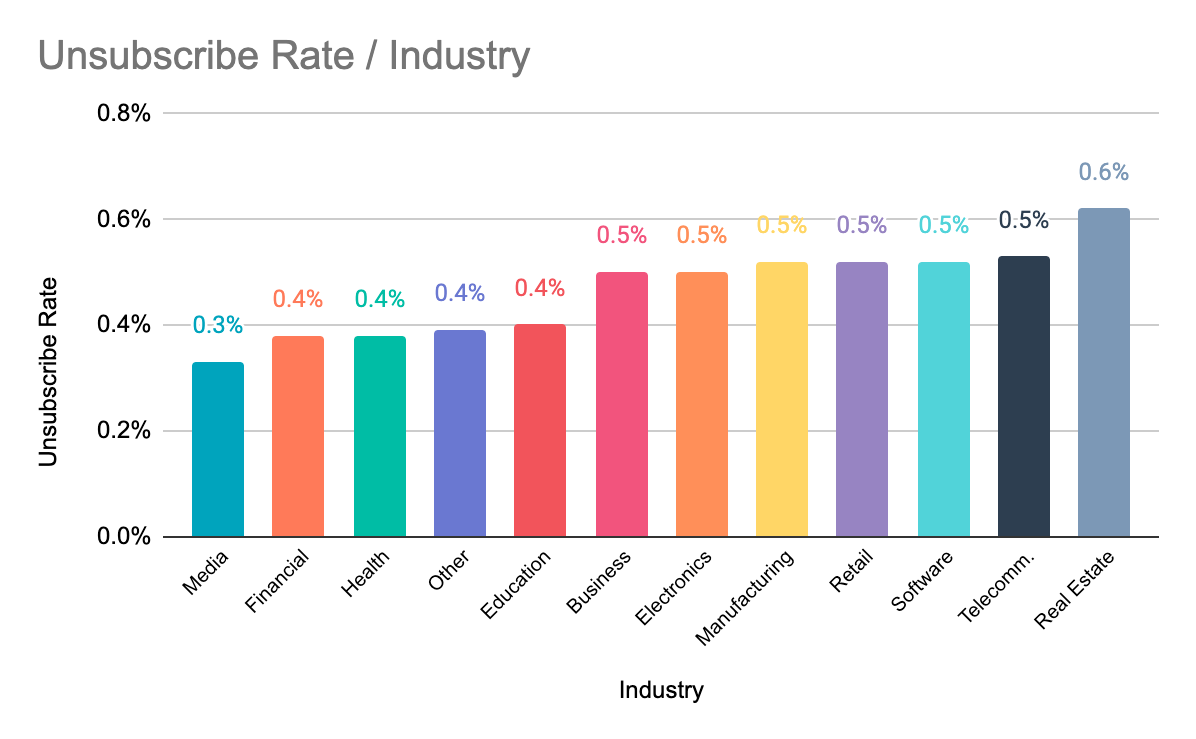
It’s best to clean your mailing list every year or so, but a good indicator is checking your unsubscribe and open rates and making sure those numbers are staying in a normal range.
Check Inactive vs. Disengaged Subscribers
Are they clicking on any links? Did they open an email from you in the last few months? Is there a chance for reengagement?
You’ll need to decide on some of the criteria above and how you’ll define completely inactive subscribers and disengaged subscribers. Reducing unsubscribes starts with removing inactive subscribers that are most likely to start unsubscribing from your content. Then, you can segment disengaged subscribers and try something different to reengage them with your content. If they’re still disengaged after your reengagement efforts, it may be time to mark them inactive and remove them from your mailing list.
Bounced Emails
Removing hard bounces from your mailing list is important to keeping a clean mailing list and keeping your bounce rates and email deliverability in check. Be sure to check if it’s a hard bounce or soft bounce before removing them from your list. A soft bounce could just be a temporary issue such as a full inbox, meaning there’s a chance for reengagement with your content still.
Checking Spam Filters
Spam filters hurt your email deliverability and your reputation. Anyone who marks your email as spam should be removed as soon as possible.
Unsubscribes are difficult to see on our content emails. Reducing unsubscribes can be easy using these few tips and making sure to clean your list about every year. The most important takeaway should be to always deliver on your content promises and give subscribers the content they want, when they want it.
[ad_2]
Source link